Showing posts with label tutorial. Show all posts

January 9, 2013

A little note (tutorial)

Karen

Hello Artful Delight Readers! I'm a clean and simple crafter at heart and love all the embellishments that come with the Artful Delight Card Kits each month. Sometimes I don't like to have a lot of layers on my cards, but still want to use each and every embellishment, like the brads. Today I have a quick trick to show you how to get the most use out of brads without adding the additional bulk or layers to your cards-it takes literally less than a minute to transform them.


The January kit contains these big beautiful brads with patterns that match the papers included in the kit. Essentially, we are transforming the brads into buttons! First, turn the brad upside down and begin bending the pegs back and forth until they simply snap off. 
Discard the pegs.
Sometimes you are left with some sharp metal edges leftover from the pegs. Simply take a file (like a crafter's file, a metal file, or even a nail file) and sand down the sharp edges.

Adhered the "new brads" to your project using glue dots or foam squares-you now have the option to use them directly on the card base as I have done here! No need to worry about tucking the pegs behind a layer of patterned paper or leave an ugly mess inside your card! This idea would work well on scrapbook layouts too, I'm all about reducing the bulk of the final album...

Please make sure you stop by Karen's blog here!

December 5, 2012

Tutorial by Karen

Doubling up your Die Cuts

KAREN

The December Card Kit is full of amazing goodies-perfect for your holiday cards and beyond. Karen from The Bald Dragonfly here to show you a quick way to double up on your die cuts.  I was quite smitten with the twine wrapped deer die cut included in the kit (because of its shape and size) and wanted to make multiple cards!

I unwrapped the twine from the deer and peeled off the adhesive backing, going slow and careful as to not compromise the integrity of the chipboard.

The next step was to position and trace the die cut onto card stock. (For clarity purposes I'm showing this part on white card stock, but as you can see from the above card I used a piece of the lovely green card stock included in the kit) and trace around it with a fine tip marker.

I flipped the die cut and then traced around it, omitting the antlers to create a female deer. Once both deer had been traced, I filled in any missing lines and assembled the rest of the card with strips of patterned paper from the kit as well as a die cut heart. (The sentiment was stamped with a set from my own stash).


So that was one way to double up on your die cuts...but now I've got a card to show you that actually used the real die cut!
Here I customized the die cut to suite my own needs-- I wanted more of a rustic look to match some of the patterned paper included in the December kit.

 I started by sanding lightly some of the pattern off the die cut.

Then I came back with a distress ink pad and foam inker to cover up the scratches and assembled the card with a stamped background, red frill and a patterned paper sentiment-all from the kit! I hope that you'll be inspired to double up your die cuts as well, and this month's Artful Delight Card Kit has just the perfect die cuts to do so!


June 8, 2012

Misting Tutorial


Good Morning and Happy Friday.  It is supposed to be a hot a humid weekend here so I guess it's a good thing I have to work all weekend..  :-)  Did you see that we carry the Silhouette Cameo and some accessories in the store now?  Super excited and I think we have offered the lowest price out there for the Cameo machine.

We have an awesome tutorial to share with you today.  Karen shares with us some tips and tricks on misting.  Artful Delight carries a variety of Mister Huey's mists and we we will soon carry a small variety of October Afternoon, Sprinklers.  


Here is Karen's tutorial:

Artful Delight carries Mr. Huey's Mists by Studio Calico in the store in a variety of colors and I'll showcase a few of the many different styles you can achieve with them! Misting is a fun technique for both card makers and scrapbookers, it gives texture and dimension without the added layers and also adds a bit of whimsey and fun! I'm using the summery, Sunshine color today.


The first type of misting is what I call "normal." This is simply spraying one full squirt of mist about five inches away from your card stock. There is a concentration of the ink in one area, and the farther away you get from the central point, the finer the misting is.


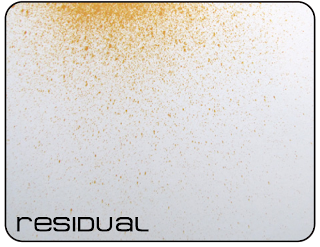
The next type of misting is "residual." This look is achieved by spraying one full squirt of mist about seven inches away from your card stock, making sure to move your hand in a slow sweeping motion. Since I use a few plastic bags under my card stock to catch the over-spray, I start spraying slightly off the piece of card stock. This technique gives you less saturated color.


The "splatter" technique is achieved by opening up the cap of the mist bottle and flicking the tube full of ink onto your card stock. The end result leaves large, heavily concentrated splotches of color.


The final technique I'm showcasing today is the "combo" technique, with is simply a mix of any of the technique listed above but using two different colors of spray mists. You can achieve different results by the amount of time you allow for drying of your first layer.


 I thought I'd include a few samples made from the technique squares. This card uses the "residual" technique. I trimmed down the panel and adhered it to a card base that has been stamped with the circles from Geo-Graphic by Paper Smooches, the stamp set included in June's kit. I also added a sentiment and some patterned paper from the Simple Stories Summer Fresh patterned paper pad, the 6x6 pack included in June's kit as well.

This card showcases the "splatter" technique, which I always equate with a fresh and modern style. I stamped the hexagons from Geo-Graphic and added another Paper Smooches sentiment. A piece of patterned paper included in the kit was added and then all adhered to the card base.


And there you have it.  I hope you give misting a try and I would love to see what you create.  If you create a card using a misting technique, feel free to comment on this post and leave me a link or you can also share  with us on Facebook.

A few new Paper Smooches stamp sets have been added to our store as well.