We have an awesome tutorial to share with you today. Karen shares with us some tips and tricks on misting. Artful Delight carries a variety of Mister Huey's mists and we we will soon carry a small variety of October Afternoon, Sprinklers.
Here is Karen's tutorial:
Artful Delight carries Mr. Huey's Mists by Studio Calico in the store in a variety of colors and I'll showcase a few of the many different styles you can achieve with them! Misting is a fun technique for both card makers and scrapbookers, it gives texture and dimension without the added layers and also adds a bit of whimsey and fun! I'm using the summery, Sunshine color today.
The first type of misting is what I call "normal." This is simply spraying one full squirt of mist about five inches away from your card stock. There is a concentration of the ink in one area, and the farther away you get from the central point, the finer the misting is.
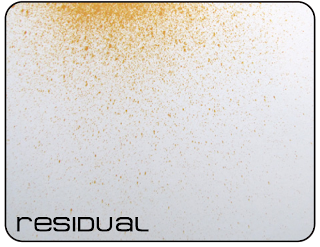
The next type of misting is "residual." This look is achieved by spraying one full squirt of mist about seven inches away from your card stock, making sure to move your hand in a slow sweeping motion. Since I use a few plastic bags under my card stock to catch the over-spray, I start spraying slightly off the piece of card stock. This technique gives you less saturated color.
The "splatter" technique is achieved by opening up the cap of the mist bottle and flicking the tube full of ink onto your card stock. The end result leaves large, heavily concentrated splotches of color.
The final technique I'm showcasing today is the "combo" technique, with is simply a mix of any of the technique listed above but using two different colors of spray mists. You can achieve different results by the amount of time you allow for drying of your first layer.
I thought I'd include a few samples made from the technique squares. This card uses the "residual" technique. I trimmed down the panel and adhered it to a card base that has been stamped with the circles from Geo-Graphic by Paper Smooches, the stamp set included in June's kit. I also added a sentiment and some patterned paper from the Simple Stories Summer Fresh patterned paper pad, the 6x6 pack included in June's kit as well.
This card showcases the "splatter" technique, which I always equate with a fresh and modern style. I stamped the hexagons from Geo-Graphic and added another Paper Smooches sentiment. A piece of patterned paper included in the kit was added and then all adhered to the card base.
And there you have it. I hope you give misting a try and I would love to see what you create. If you create a card using a misting technique, feel free to comment on this post and leave me a link or you can also share with us on Facebook.
A few new Paper Smooches stamp sets have been added to our store as well.


11 comments:
Wowwwwwwwwww!! LOVING all the tips!!!!! And your cards are GORGEOUS!!!
Love it! I was thinking about picking up the white one! :)
thanks so much for this tut!!!! will now give misting another try :)
love love love your cards girl :)
Great guide. Thanks!
I've always wondered how on earth it was done. Thank you so much for sharing all your great pointers, Karen. You're fabulous!
Awesome tutorial, thank you so much!
The misting queen, Karen, has fab tips! Thanks!!!
There seems to be no end to your expertise in creative card design! thanks so much for the helpful hints with Mr. Huey. Love both of these projects, there are truly endless effects with this stuff! :)
Cool, Karen! I never thought about the different ways of misting--this tutorial really helps!
thanks for sharing the techniques, Karen! love your fab cards!
Great tips!
Team Craftwell
blog.craftwellusa.com
Post a Comment