I am so excited to be able to share with you a tutorial today. Our Delightful Designer, Karen, has a very inspiring tutorial to share with you.
Here is Karen's tutorial:
Ever wonder what to do with those itty bitty stamps included in sets?
Try reaching outside the box and use them by themselves to create cool
and funky backgrounds through multiple stamping! Let me quickly show you
two ways on how to do this, both creating a huge impact! My cards today
feature the stamps from Lawn Fawn's Sunny Skies, the really fun and
versatile set included in this month's card kit!
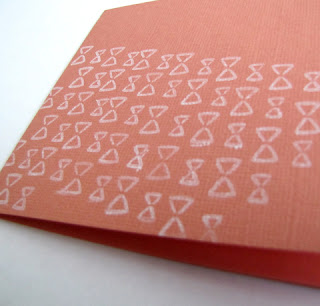
The first way to use the small stamps to create a background is stamping them in some sort of pattern. Start by arranging the stamps in a pleasing arrangement onto your block, in this instance I placed the small kite bow tie just a smidge under and to the right of the large bow tie. Ink up your stamp and stamp onto the paper, in this case it is the fun coral solid cardstock from this month's kit. You'll want to re-ink your stamps for each impression, but be careful not to re-arrange your stamps until your card base has been completely stamped!
Stamp again, either to the left or right, top or bottom of your first
impression. You will see your pattern develop, and each impression
thereafter, stamp to follow your general pattern. I wasn't very precise
with the stamping on this card, but if you wanted to, you could create
light guidelines with a pencil and then erase after stamping.
Once your stamping has been completed, you can end up with a completely
different look then what your stamps were meant to be for! In this case,
I created a modern and trendy pattern reminiscent of a textile pattern.
I added a touch of color with marker and finished the card with a
sentiment and the sun, all from this month's kit.
The second way to use small stamps to create a new background is to
stamp one image in a random fashion, alternating the position of the
stamp as you go, onto your card stock (the lovely yellow paper is from
this month's kit too!). I find that keeping to one ink color on most of
your outlined images help create solidified background pattern better
than using multiple colors. To finish this card, I added a touch of
monochromatic shading with a marker, and added a banner and sentiment
from two other Lawn Fawn sets.
I hope that you are inspired to take a closer look at the small stamps
included in your sets and create a cool, new, and totally unique
background!
Thanks Karen for that awesome tutorial. I can't wait to get to craft again because I will certainly be trying that technique!!


8 comments:
Great tutorial Karen, love the idea of making a tiny bit stamp turn into something bigger.
WOW!!! Karen's background technique is awesome!!!!! I loveeeeee her cards!!! Enjoy your time off!!!
GREAT IDEA!! Cute cards!
~Kim
Very cool Karen!!
Happy Birthday to your sweet babies this month Leeanne. :)
Great tutorial! Love the idea of making your own backgrounds.
Awesome tutorial Karen! Your cards are fabulous. I am definitely going to try this.
such fun and clever way to use those smaller stamps! thanks so much for the tips, Karen!
Such a great tutorial!!!
Post a Comment